Як створити нову групу:
Щоб створити групу перейдіть до розділу: Адміністратор школи – Групи – Додати групу;
Ви побачите картку з полями, які необхідно заповнити. Деякі поля є обов’язковими, деякі ні. Надаємо пояснення термінів, які будуть використані.
Основна інформація:
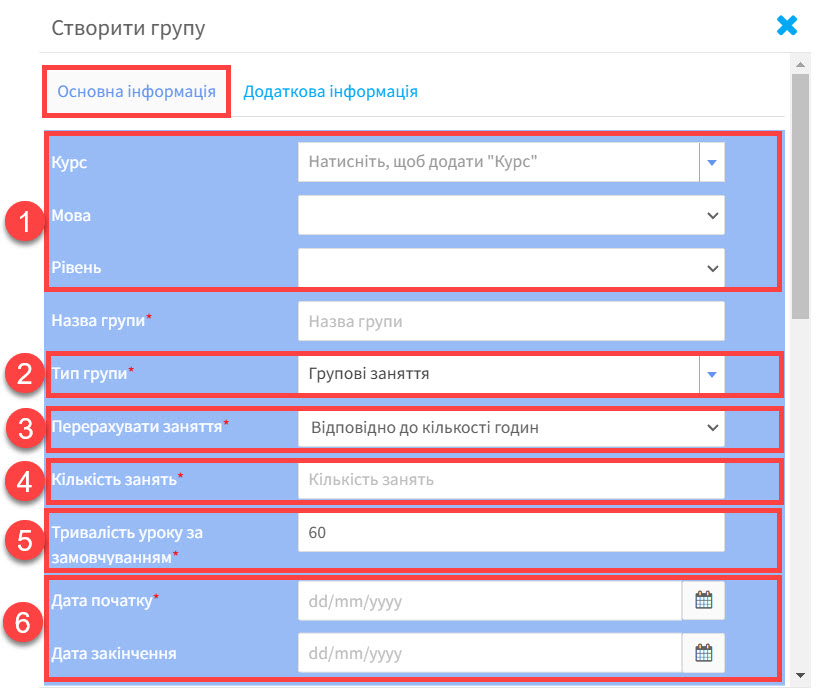
Перша частина картки “Створити групу”:
1. Курс:
Курс – це тип заняття, наприклад Загальна англійська, Бізнес англійська. Група є підмножиною курсу: Cambridge FCE 1, FCE 2 etc. Це не є обов’язковою частиною під час створення групи. Але це є корисним способом зв’язати схожі типи груп для статистики та маркетингу, і т.д. Ви можете дізнатися більше про курси тут.
Мова та рівні: ці складові можна побачити, перейшовши у Налаштування – Налаштування груп.
2. Тип групи:
Ця функція дає можливість класифікувати ваші групи, індивідуальні групи, компанію, і т.д. Це можна зробити, перейшовши у Налаштування – Налаштування груп.
3. Перерахувати заняття:
Це поле визначає тип уроків у групі і їх типи:
- Згідно з кількістю годин. Все, що вам необхідно зробити – це вказати скільки годин триватиме ця група. Вкажіть дату початку занять і система запланує точну кількість годин. Якщо ви вирішите скасувати урок, система запитає у вас чи бажаєте ви перенести цей урок, щоб кількість годин залишалась, як було заплановано.
- Згідно з кінцевою датою. Тут вам необхідно вказати дату початку та дату закінчення занять. Система не буде створювати уроки в святкові дні.
- Згідно з кількістю уроків. Подібно до першої опції, але вам необхідно вказати кількість уроків від дати початку і система попіклується про решту.
4. Кількість занять:
Ця опція з’явиться, якщо ви обрали кількість годин або кількість занять у пункті 3.
5. Тривалість уроку за замовчуванням:
Ця функція контролюється в розділі Налаштування – Базові налаштування і можуть бути перевизначені.
6. Дата початку і дата закінчення:
Для кожної групи необхідно вказати початкову дату, але кінцеву дату треба вказувати лише для груп, які створені “Згідно з кінцевою датою”
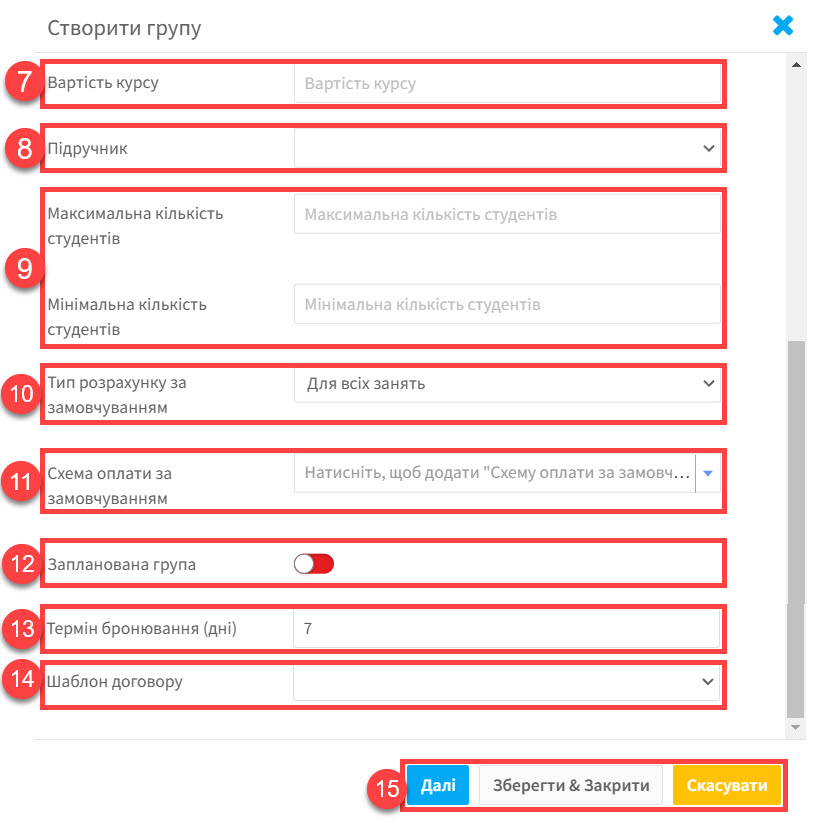
Друга частина картки “Створити групу”:
7. Вартість курсу:
Ця функція необхідна, якщо ви хочете виставити рахунок на вартість курсу. Це ціна курсу за замовчуванням, але кожен студент може мати різну вартість, спосіб оплати та персональні знижки. Більше інформації можна переглянути в модулі “Фінанси”.
8. Підручник:
Ця функція контролюється в розділі Налаштування – Налаштування груп – Підручник .
9. Максимальна кількість студентів та мінімальна кількість студентів:
Ці значення використовуються для створення звітності щодо доступності й т.д. Система не дозволить додати до групи кількість студентів, яка є більшою за дозволену.
10. Тип розрахунку за замовчуванням:
Існує 3 способи виставити студентам рахунок за заняття.
- За всі заняття.
- Погодинна заборгованість.
- Погодинно наперед.
Більше інформації доступно в модулі “Фінанси”
11. Схема оплати за замовчуванням:
Якщо ви дозволяєте студентам оплату частинами, ви можете обрати план розстрочки тут. Більше інформації ви можете знайти у модулі Фінанси. Щоб скористатися цією функцією, ви повинні активувати її у Системних конфігураціях – Керування групою.
12. Запланована група:
Якщо наразі ви не хочете показувати деталі групи студентам та викладачам, позначте це зеленим кольором. Коли ви готові поділитись деталями групи, змініть знову на червоний колір. Щоб користуватися цією функцією, ви повинні активувати її в системних налаштуваннях – Керування групою.
13. Термін бронювання:
Можливо, ви б хотіли, щоб ваші студенти могли зарезервувати місце в групі. Це є зарезервованим періодом за замовчуванням і він буде показаний в деталях бронювання. По-перше, вам необхідно активувати “Зарезервовані місця і в очікуванні” в системних конфігураціях – Керування групою. Кількість днів за замовчуванням контролюється в Налаштування – Налаштування групи.
14. Шаблон договору:
Ця функція дозволяє автоматично прикріплювати угоду до студента, який приєднався до групи. Виберіть бажану угоду з переліку. Угоди створюються в розділі Документи.
15. Створення групи:
Коли ви ввели всю інформацію про групу, натисніть на “Далі” або “Зберегти & Закрити”, щоб створити групу.
- Якщо ви натиснете на “Далі”, ви потрапите на сторінку картки студента.
- Якщо ви натиснете на “Зберегти & Закрити”, група буде створена і картка закрита, але ви можете додати студентів пізніше.
Після створення групи, картка буде створена. Ви можете дізнатися більше тут.
Додаткова інформація:
Якщо є щось, що ви б хотіли занотувати про групу, що не є в карті з основною інформацією, ви можете створити це у Формах і потім зберігати інформацію там. Ви можете відфільтрувати і шукати це поле.
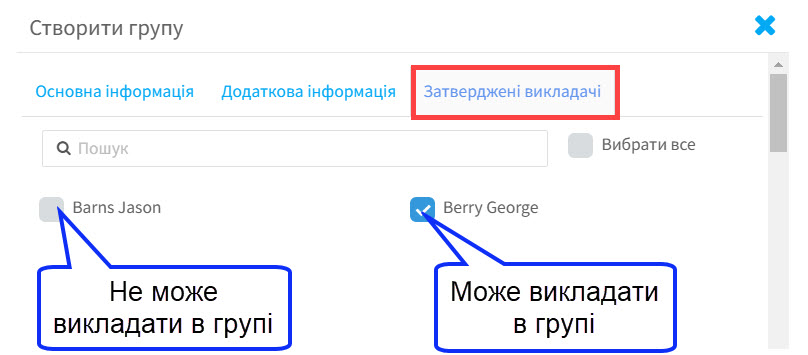
Затверджені викладачі:
Коли ви додаєте викладачів до груп, ви можете відфільтрувати їх за мовами, навичками й т.д. Але може статися таке, що викладач, який має всі навички, не затверджений самою групою. Картка затвердженого викладача дозволяє вам видалити викладача з процесу вибору.
Картка показує усіх активних викладачів. Якщо ви приберете галочку з викладача, він не буде з’являтися у вибірці.
Щоб ця функція працювала і картка з’являлася, вам необхідно поставити галочку навпроти “Показати затверджених викладачів” в основних налаштуваннях.
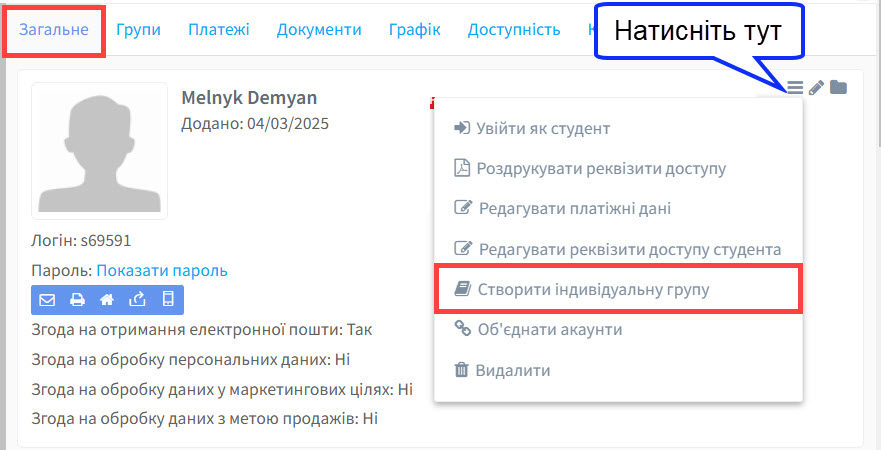
Як створити індивідуальну групу
Ви можете створити групу для індивідуального студента в точності, як описано вище і потім додати студента в групу. Проте, існує ярлик на карті студента. Якщо ви натиснете на “Створити індивідуальну групу”, ви збережете час і автоматично можете зарахувати студентів у групу.
Як створити нову групу, використовуючи шаблон старої групи
Інколи групи продовжують навчання після літніх канікул і вам необхідно створити уроки для студентів, які повернулись з канікул.
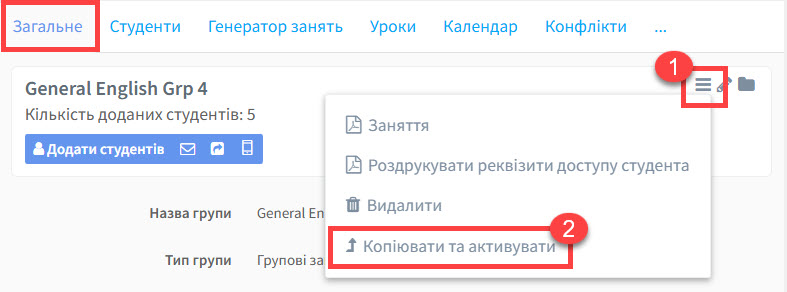
Перейдіть до картки групи, яку ви хочете скопіювати:
- Натисніть на іконку з 3 лініями.
- Натисніть на “Копіювати та активувати”.
Коли ви натиснете на іконку, система запитає вас, як ви хочете продовжити.
- Копіювати з налаштуваннями генератора – ця опція покаже редагування картки групи, щоб ви могли змінити будь-які деталі: вартість, дати й т.д. перед створенням нової групи. Нова група створена з тими самими студентами, викладачами й датами занять, але без уроків. Для цього вам необхідно буде згенерувати заняття.
- Копіювати без налаштувань генератора – ця опція покаже редагування картки групи, щоб ви могли змінити будь-які деталі: вартість, дати й т.д перед створенням нової групи. Але група не матиме жодної інформації, на кшталт студенти, викладачі та дати занять.
Можливо, ви бажаєте перенести вихідну групу до архіву після створення нової групи.


