This tutorial has a number of sections dealing with Class Status, Attendance, Class Details and Student Cancellations.
Class Statuses:
SchoolMate assumes that all lessons are taught as planned. Class statuses let you mark a lesson to show if there is anything different about it. You do not need to make changes for lessons which are taught as planned.
- Click “Add”.
- Put in the name.
- Select a function. The possible functions are:
- Empty – this is the default, this function will not make changes to the system.
- Cover – if this is selected then, a card will appear from where you can choose a replacement teacher for the lesson.
- Lesson cancelled – if this is chosen, you will be asked if you want to replace the cancelled lesson to match the total number of lessons for the group. The group end date will change.
- Lesson took place – this will include the lesson in the teacher’s pay settlement.
- Day off – a lesson with this status will not be included in the student’s and teacher’s settlement, this status will result in a message asking whether to re-generate the classes to add another lesson (to match the total number of lessons). The group end date will change.
- Skip date – a lesson with this status will not be included in the student’s and teacher’s reckoning, you will need to re-generate the classes to add a new lesson. The group end date will change. The lesson will not appear in the classes list.
- Enter the percentage the student will pay of the fee for the lesson and the percentage of the regular payment the teacher will receive for the lesson. In case of the student, the percentage of the fee is taken into consideration when it is paid hourly or hourly in advance.
- Click “Save”.
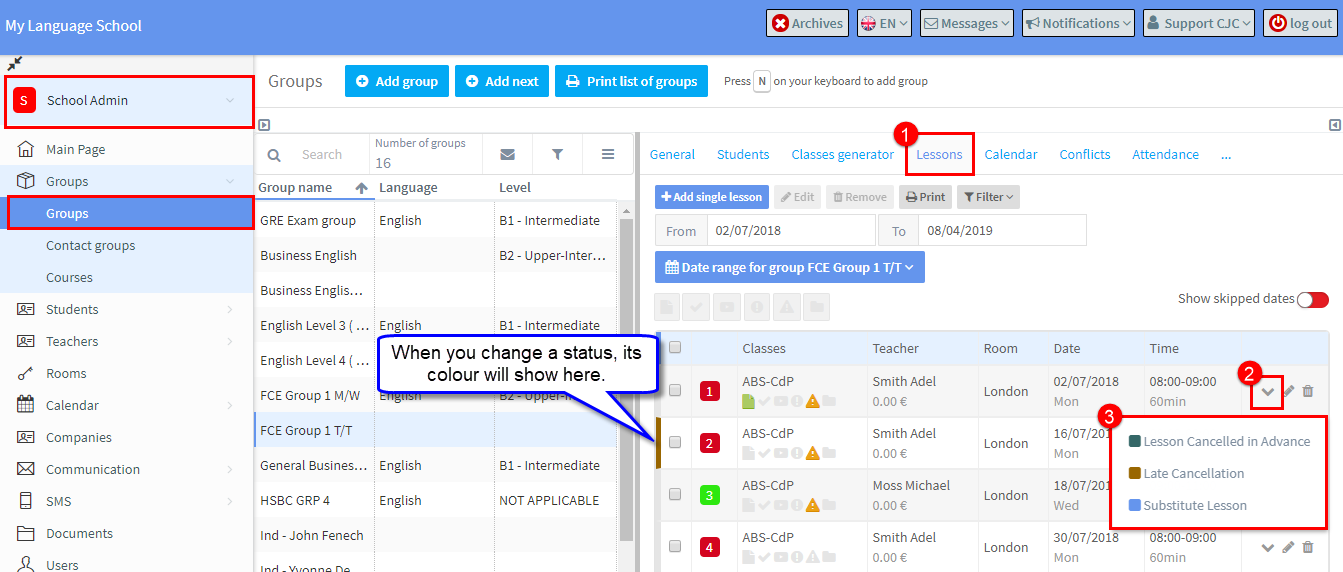
 Where are Class Statuses entered?
- Go to the lessons card in groups.
- Find the lesson and click on the V.
- Select the lesson status you want to apply.
Attendance Statuses:
SchoolMate assumes that students attend lessons, and PRESENT is the default attendance setting for students, therefore, we only need to have attendance settings for anything other than PRESENT.
- Click “Add”.
- Give a name to the item.
- Give a short name – this will appear in the attendance summaries.
- Function – what does it mean in terms of the student’s attendance
- Absent – they will be counted as not attending.
- Present – they will be counted as attending. Only create something for Present if it is different to regular attendance i.e., the student attended the class but was late.
- Not counted as attendance – for these students it is as if the lesson never happened, so they can still get 100% attendance overall for the course.
5. % student’s fee – will the student be charged for this lesson, and if so, what % of the lesson cost?
6. % participants total attendance – how many percent will the student get for a lesson with this status? You might want to give 80% for late, 50% for very late. It depends on your school’s rules.
7. Click “Save”.
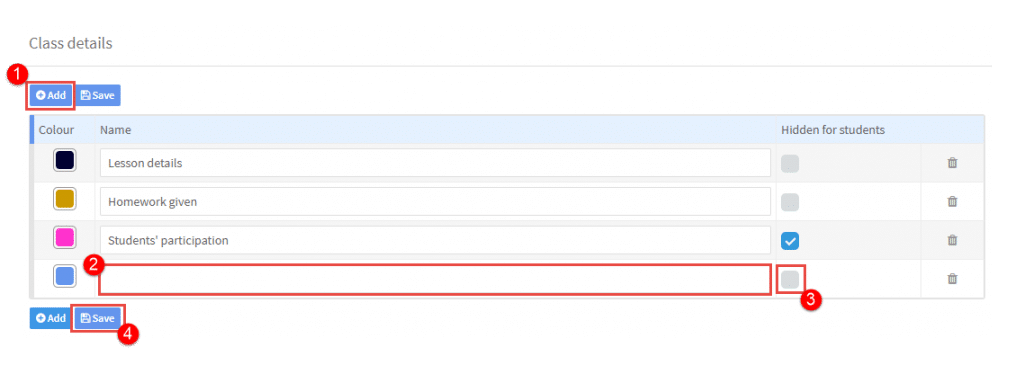
Class Details:
Teachers, when they log in, in addition to adding attendance can add information about the lesson itself. The topic headings for the teacher to fill in are created and held here:
- Click “Add”.
- Fill in the name of the area.
- Select whether it is hidden from students or not.
When teachers enter the information, if they want to share it with the students they need to click Publish, otherwise it will remain internal. Even when they do click publish, if a topic is ticked to be hidden from students it will remain private.
Class Cancellations:
If you wish, you can allow students who are in individual groups to cancel their lessons in advance. These are the settings which determine whether a student can cancel a lesson and whether they will have to pay or not.
- Click here to activate student cancellations.
- Enter the number of hours before the start of the lesson that will determine whether it is cancelled in advance or late. In the case below the settings is 24 hours. So, if the student cancels 25 hours before the start of the lesson, it will be counted as cancelled in advance and if 23 hours before the start it will be considered late and the student will be charged for the lesson.
- Select the status for a lesson cancelled in advance. The items in these drop-downs are explained in Attendance Statuses above.
- Select the status for a lesson cancelled late. The items in these drop-downs are explained in Attendance Statuses above.
- Click “Save”
Related Tutorials:
How Teachers add Class Details.
Teachers’ tutorial on filling in attendance.
How can I substitute a teacher in a lesson and show it in the system?


